|
As you maybe know in Swing you can set a custom background color for controls. This is a nice feature but how can a single color be used to support all different states of a control, e.g. hover, pressed, selected. And what happens if a control by default is not painted with a single solid color because gradients are being used? Well, Synthetica supports additional properties to get the best possible result without losing the default style.
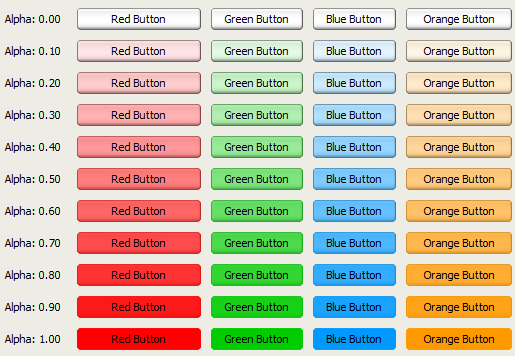
Prior Synthetica V3.4 we supported two client properties Synthetica.background and more important Synthetica.background.alpha. Synthetica.background can be used if Component#setBackground(Color) can't be used for some reason and has higher priority. Synthetica.background.alpha is a value between 0.0f and 1.0f and defines how much of the background color is mixed in to the visual representation of the control. In most cases this works fine for values below 0.5f - however, the higher value is, the more other colors (gradients) of the control disappear and different states (hover/pressed/selected) are harder to recognize. That's why in most of your themes the alpha value is predefined to 10% or 20%, so if you set the background color for e.g. a button, it appears slightly tinted. You can change the behavior by modifying the alpha value globally as UI-property or as client property. A client property value of 1f means 100% mix, so the control appears completely in the given solid background color - see screenshot below.
Transparent Colors
As you maybe know a color also has an alpha value which defines the transparency of that color - however, previously the alpha value was ignored and handled by the UI-property and client property Synthetica.background.alpha instead. Since Synthetica V3.4 and V2.33 is no longer the case. Now the alpha value of the background color has highest priority followed by the client property Synthetica.background.alpha - the UI-property Synthetica.background.alpha has lowest priority. You should also know that an alpha value does not work with all supported blend modes - for more details see section Blend Mode below.
Blend Mode
To improve the coloring of controls Synthetica V3.4 and higher supports a new UI-property and client property to specify a blend mode. The property Synthetica.background.blendMode supports the blend modes listed below. Please keep in mind that the alpha property/value works only in combination with the default or ALPHA blend mode. All modes are defined in Synthetica2DUtils.BlendMode.
-
ALPHA - the blend mode which was used prior V3.4
-
COLOR_BURN
-
LINEAR_LIGHT
-
LUMINOSITY
-
MULTIPLY
-
OVERLAY
-
SOFT_BURN
-
SOFT_LIGHT
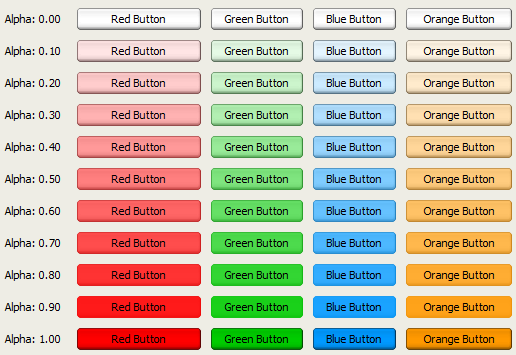
In Synthetica V3.4 the default blend mode has been improved too. This means if no blend mode is set and the alpha value is less than 1f the ALPHA blend mode is used - for alpha values of 1f the MULTIPLY or LUMINOSITY blend mode is used depending on the active theme. This smart algorithm allows you to use saturated background colors in your application without losing usability. In most cases the default setting works fine and helps you to create great looking applications. In the screenshot below you can see that the button gradients of the last row are still visible even with a completely saturated color.
Examples
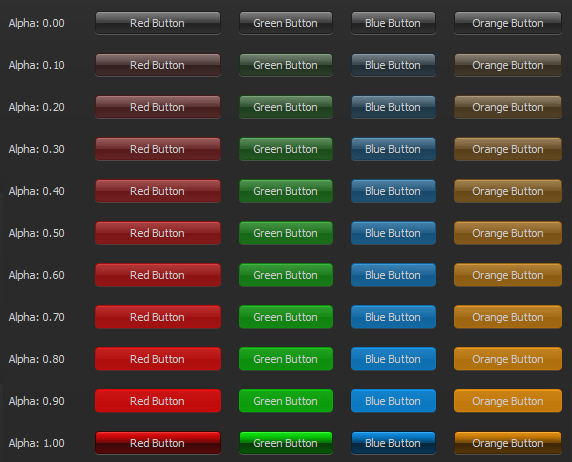
The difference is even more drastical when using our BlackEye theme. In the screenshot below the last row appears pretty different because the LUMINOSITY blend mode is used for an alpha value of 1f. In the BlackEye theme the default alpha value is globally set to 100 (means 100%) with the UI-property Synthetica.background.alpha. Prior Synthetica V3.4 the default setting was 10 - means 10%.
In case you want the old coloring back you can set the UI-property Synthetica.background.alpha globally to 10 or if only required for some specific buttons you can set the client property to 0.1f - see example below.
//Example:
UIManager.setLookAndFeel("de.javasoft.synthetica.blackeye.SyntheticaBlackEyeLooAndFeel");
UIManager.put("Synthetica.background.alpha", 10);
...
// set alpha for a specific button only
JButton myButton = new JButton("MyButton");
myButton.putClientProperty("Synthetica.background.alpha", 0.1f);
myButton.setBackground(Color.RED);
...
In case you want to set the blend mode for some specific controls simply set the client property Synthetica.background.blendMode to the required mode just like in the example below.
//Example:
...
// set blend mode for a specific button only
JButton myButton = new JButton("MyButton");
myButton.putClientProperty("Synthetica.background.blendMode", "ALPHA");
myButton.setBackground(Color.RED);
...
Parent Background
There's also one special thing. As you maybe know Component#getBackground() can return the background color of the parent control. This is e.g. the case if you set the background color for a panel and you place some buttons on it. In this case Synthetica will colorize all these buttons because JButton#getBackground() returns the background color of the panel. This happens for all Synthetica releases prior V3.4 and V2.33. However, since Synthetica V3.4 and V2.33 this is no longer the case. Generally there are four ways to avoid this behavior.
-
Switch to Synthetica V3.4 or higher / V2.33 or higher
-
Set a ColorUIRersource instead of a Color for the panel
-
Set the client property Synthetica.background.alpha to 0f for all related child controls
-
Set a background color for all related child controls
For compatibility reasons since V3.4 (V2.33) it's also possible to switch back to the old behavior by setting the UI-property Synthetica.background.respectParent to true.
Product Links
|